Friday, February 10, 2017

The most beautiful papers...that you'll never see!


My kindergartners make this amazing art book throughout the year as they explore all things art. Primary colors, lines, shapes, cutting, glueing, patterns, self-portraits...whew! Well, my favorite page is Page 9 - Warm and Cool Colors. Here's the jist of it: they put a piece of plain white paper on a large tray, I come around and shoot the paper with a large spray bottle of water, they quickly drop individual pieces of tissue paper onto the wet paper and POOF - the tissue papers stick! I walk around spraying and they keep adding squares of tissues. 


The next day, when the entire piece is finally dry, I take it to the garbage can and shake, shake, shake until all the tissue papers fall off! Because we used BLEEDING tissue papers, their white paper has transformed into a beautiful tie-dye masterpiece!


The kids love the wet tissue papers but they have no idea how beautiful my garbage gets to be for the day! I only wish I didn't have to throw it all away - there MUST be another project that I could use these tissues for...any ideas?!?


~Amy

Wednesday, January 11, 2017

I forgot one?!

2014-2015 CD Weavings - 6th grade Legacy Project

I LOVE our Legacy Project tradition and was shocked to realize that I totally forgot to tell you about the one we did two years ago! It is hanging in our computer lab, is about 5' tall by 7' wide, and is made out of recycled CDs and some of the craziest yarn I've ever purchased!

The 6th graders warped the CDs with thin yarn, cut out and made needles out of plastic lids, and then proceeded to weave "over-under-over-under" with yarn in all sorts of cool colors and assortment of textures. I don't have any pics from during the process because it was so long ago, but there is a great tutorial here.  Enjoy the pictures!


And truth be told, I totally complained about all the cutting and glueing for the broken CD border, but I just love it! Makes for such a great contrast for the soft, fuzzy yarn on round CDs to have these shiny, jagged pieces framing the entire project.


Thursday, October 20, 2016

Presenting at WAEA 2016!

After attending the national convention in Chicago last spring, two of us decided to "take our show on the road" and try our hand at presenting at our state convention.

Well...today was the day and it was awesome! We were in a huge theater, the technology never glitched out on us, we had a ton of people listening to our crazy ideas (and even laughed at our jokes) and our timing was pretty good to fill the 50 minute session. I have said before that I love passionate educators and to stand on the stage with a dear coworker, who is as passionate and as creative as they come, was an absolute joy today!

If you want to see our presentation on how to pull off an over-the-top, themed Art Show, you can click on this link:
http://bit.ly/2eJVJRg

~Amy

Tuesday, September 13, 2016

Back to School 2016 - Art Room Tour

Happy "back to school" time! Here's a quick photo tour of my Art Room and you'll find some info in the captions.

Enjoy!
We've got a "Road Trip" theme this year - riding the road to success with a little Disney love!


Thanks to the Dollar Spot at Target, I have a new vinyl cling for my wall, a new ROYGBIV'd poster and new marker buckets!

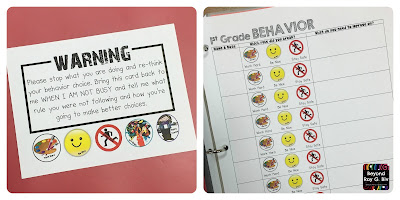
I'm trying a "Behavior Notebook" this year to keep better documentation about student behaviors. Thanks Pinterest!


Besides getting my classroom ready for the new school year, I also have the "honor" of decorating all the bulletin boards for Open House. Here are some of the cute ones. And I do love me some thematic fonts!


This one is my favorite - it's is our PBIS bulletin board that helps track how many Paw Prints our students earn for an end-of-the-year, all-school party. I love the watercolor "road" over the real map!


And today marked an exciting day - I finally gave my last "first day of school" speech! I give that same "these are the rules, here are the jobs, how you get points, blahblahblah" speech 20 times at the beginning of every new school year! I've been making Prezis to make it more engaging for a few years now - check them out and give it a try.

Enjoy the quick tour and have a great September!

~Amy


Wednesday, May 11, 2016

Another Legacy Project Unveiled

This is our 7th year doing a 6th grade Legacy Project - which I describe to the kids as a "gift of personal property, handed down from the past to the future."

Finished mural - almost 8' wide!

This year, we made faux-repousse tiles with 7" cardboard squares, yarn, spray adhesive, aluminum foil and oodles of colored Sharpies. (You can find an excellent tutorial at A Faithful Attempt.) Our theme was "Wisconsin Nature" and  while we have some repeated images (four foxes, six birds, etc...), all SIXTY-ONE students took their idea and put their unique personality into it - I could not be more proud of them!
Avery's Butterfly

Brady's Leaf

Coleman's Fox

Peyton's Ladybug

Sofia's Campfire

And while this is the absolute largest Legacy Project at almost 8' long, next year we will have to go a bit smaller because our main office has made a request and their space is the smallest we will ever tackle. Good thing I'm always up for a challenge!

~Amy

Wednesday, March 2, 2016

Happy Thoughts

Looking around my school brings me joy...most days! This week, these are the things that I think are pretty awesome!


4th Grade Radial Prints
Truth be told, these may be prettier from far away than up close. Using donated cardboard, each 4th grader created a "printing plate" for this collograph project. On their 9" square of white paper, they blended chalk pastels in analogous colors (which I called OMBRE and they all said, "Ohhhh!" because that apparently sounds way cooler!) Then, using black ink and brayers, they printed their plate four times in a radiating pattern. Overall, a great/cheap way to introduce printmaking with cardboard, but the end bulletin board display knocks my ROYGBIV socks off!


When I saw THIS on Pinterest with a Tournament of Books bracket, I knew I had to adapt the idea for our sports theme this year and combine it with Youth Art Month.


Art Madness Bracket
 For the month of March, each class will vote on a head-to-head battle to decide which painting is the "best" and the variations of what "best" means to each grade level, or even each student, is fascinating. Some are voting for the most famous, the weirdest, the most details, the one they think deserve to hang in a museum, etc... And while we're voting during art class, the hallway has a large-scale bracket with pictures and some autobiographical facts and tidbits of information.


We already have some students predicting which painting will "win it all" but really, I've already won because I've got students who are actively discussing art history, outside of my art room, in their spare time! #teacherwin

Have a great week, art ed. world! Hope to see some of you in a few weeks in Chicago for NAEA!

~Amy


Tuesday, March 1, 2016

5 Tips to Get Started WEAVING

Weaving is, by far, one of my most favorite lessons of the year! Once the kids get the rhythm of it, they love it too!

Here are my top 5 tips to try weaving for your next lesson:

1. Invest in good quality cardboard looms with wide-notches.
Kids can get frustrated if the process seems too tricky or takes too long to master. Good quality looms make a world of difference in their frustration level. I often overhear, "This is easier than it looks." when I use the "good" looms. I've had some of my looms for over 10 years, and they still look and work great!


2. Teach students the correct vocabulary from the beginning: loom, warp, weft, weaving.
www.weaverandloom.com
Having them learn and apply art vocabulary is a great confidence booster in the Art Room. And its always fun when they know words that their parents don't!


3. Pre-cut your strings.
I have small plastic boxes filled with pre-cut and pre-sorted strings. This makes the process of picking out new strings so much faster, so they can get back to their weaving, as quickly as possible.


4. Have them check their weavings with you on a regular basis.

On the first day of weaving, they can choose 4 strings. When they are done with those strings, they have to visit me at a designated table and we have to check for "oops strings" - those strings that wanted to go over or under, but...OOPS...they went the wrong way!
On day two, we up the number to 6 and they are THRILLED! On day three, they can weave 8 strings before they visit me, but if they see one of those "oops strings" before they visit me, they can try to fix it themselves. And let me tell you, they are so proud when they figure out where a mistake is before I do! :-)


5. Make a few weavings yourself to understand the process and to have examples of many pattern possibilities.

In the beginning, we talk a lot about two-color patterns, like red-blue-red-blue. But as they weave more, they get ambitious. Maybe a three-color pattern, like red-white-blue-red-white-blue or red-red-red-white-white-white-blue-blue-blue, or maybe a six color pattern like the color wheel, or even a pattern that repeats with ANOTHER pattern! Their ideas are endless, but if you have some examples already made, you can easily show them what a pattern may look like ahead of time.

My 2nd graders are excellent weavers and you can see all their pieces in our Artsonia gallery.

And in the words of Journey, "Don't Stop Be-weave-ing"!
~Amy